
Hardware Specifications
| Vendor/Brand | ODI |
| Model | DFP-34X-2C2 |
| Chipset | Realtek RTL9601D |
| Flash | 8 MB |
| RAM | 64 MB |
| System | Linux (Luna SDK 1.9) |
| SFP interfaces | HSGMII |
| Optics | SC/UPC(DFP-34X-2C2), SC/APC(DFP-34X-2C3) |
| IP address | 192.168.1.1 |
| Web Gui | ✅ user admin, password admin |
| SSH | ✅ user admin, password admin |
| Telnet | |
| Serial | |
| Form Factor | miniONT SFP |
Note
SSH uses an outdated set of algorithms/ciphers, you can connect using the following command:
ssh -oKexAlgorithms=+diffie-hellman-group1-sha1 -oCiphers=+3des-cbc -o HostKeyAlgorithms=ssh-rsa admin@192.168.1.1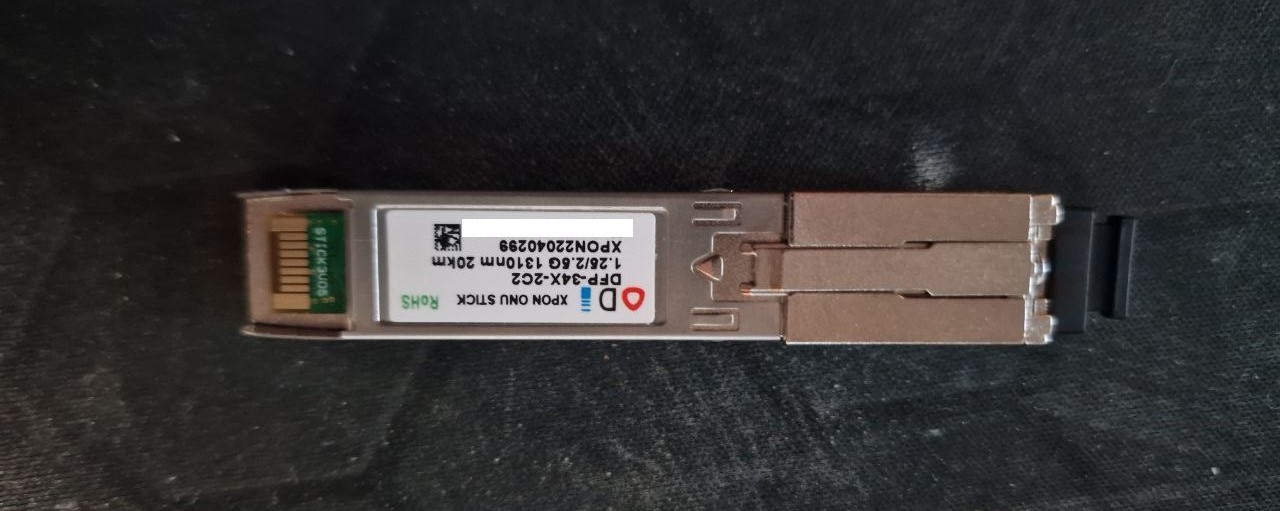
WARNING
The ODI DFP-34X-2C2 has been sold with two different chipsets with the same name: this page is about the Realtek RTL9601D one, the firmwares are not compatible with the ZTE based one.
Default credentials
Besides admin/admin, the firmware has some system users[1]: adsl/realtek, user/user (changed with flash set USER_PASSWORD) and administrator/Stel$864 (changed with flash set E8BDUSER_PASSWORD).
Default values
| Variable | Value |
|---|---|
GPON_SN | XPON1234ABCD |
PON_VENDOR_ID | HSGQ |
GPON_ONU_MODEL | DFP-34X-2C2 |
HW_HWVER | V2.0 |
OMCI_SW_VER1 | V1.0-220923 |
OMCI_SW_VER2 | V1.0-220304 |
OMCC_VER | 128 |
OMCI_OLT_MODE | 0 |
OMCI_FAKE_OK | 1 |
OMCI_TM_OPT | 2 |
OMCI_CUSTOM_ME | 65536 |
LAN_SDS_MODE | 3 (SGMII MAC) |
The defaults of the other ONTs that can be useful to clone are in the configuration table and in the list of stock ONUs of the RTL960x repository.
List of software versions
- V1.0-221209 (hybrid, HSGQ)
- V1.0-220923 (by @lanseyujie, also modded by @stich86)
- V1.0-220916 (hybrid by @lanseyujie)
- V1.0-220817
- V1.0-220530 (hybrid by @stich86)
- V1.0-220414 (vlan working)
- V1.0-220304
- V1.0-210702
List of firmwares and files
The firmwares are either SFU (bridge only) or HGU/IGD (the stick reports itself as a router to the OLT, and can also be used as a router)[2]:
| Firmware | Type | 4-port emulation | Notes |
|---|---|---|---|
M110_sfp_ODI_210702.tar | HGU | ❌ | DEVICE_TYPE is 1 (router) by default |
M110_sfp_ODI_220304.tar | SFU | ✅ | Introduces the MAC_KEY |
M114_sfp_ODI_Vlan_220414.tar | SFU | ✅ | |
M114_sfp_ODI_hybrid_220527.tar | HGU | ❌ | |
M110_sfp_ODI_220817.tar | SFU | ✅ | Includes the fix_speed.sh, fix_sw_ver.sh and fix_vlan_tag.sh scripts |
M114_sfp_ODI_hybrid_220916.tar | HGU | ❌ | Provided by @lanseyujie |
M110_sfp_ODI_220923.tar | SFU | ✅ | Provided by @lanseyujie |
M114_sfp_ODI_hybrid_221209.tar | HGU | ❌ | HSGQ, provided by @physx2494 |
The recommended versions are M114_sfp_ODI_hybrid_220527.tar or M114_sfp_ODI_hybrid_220916.tar, as these have working VLAN translation. Use an SFU firmware if the original ONT is a bridge, an HGU firmware if the original ONT is a router (some OLTs, e.g. PLDT, loop between O2 and O5 with a SFU firmware)[3].
WARNING
Switching between a SFU and an HGU firmware requires a factory reset, and then a new MAC key for the MAC address.
Fix scripts of the 220817 firmware
| Script | Description | Activation |
|---|---|---|
fix_speed.sh | Fixes the slow upload with the 2.5G modes (LAN_SDS_MODE 4, 5 or 6) | echo 1 > /etc/config/fix_speed |
fix_sw_ver.sh | Applies the custom software version (sw_custom_version0/1) | OMCI_OLT_MODE set to 3 |
fix_vlan_tag.sh | VLAN tag fix by @inyourgroove | echo 1 > /etc/config/fix_vlan |
The sources of the scripts are in the Firmware_Mod folder. The community is working on the Nijika firmware, with a Bootstrap Web GUI that also shows the ME 84 and ME 171 received from the OLT and allows to change the VLAN forwarding operation.
MAC key
From the firmware V1.0-220304 onwards, changing ELAN_MAC_ADDR requires a matching MAC_KEY, the MD5 of hsgq1.9a followed by the MAC address in uppercase[4]:
echo -n "hsgq1.9aFFFFFF000000" | md5sum
46f4ea2e3f18ba3bc1f2671b5f7e1f62  -
flash set ELAN_MAC_ADDR FFFFFF000000
flash set MAC_KEY 46f4ea2e3f18ba3bc1f2671b5f7e1f62
A key generator by @rajkosto is available here.
List of partitions
| dev | size | erasesize | name |
|---|---|---|---|
| mtd0 | 00040000 | 00001000 | "boot" |
| mtd1 | 00002000 | 00001000 | "env" |
| mtd2 | 00002000 | 00001000 | "env2" |
| mtd3 | 0003c000 | 00001000 | "config" |
| mtd4 | 0014c000 | 00001000 | "k0" |
| mtd5 | 00274000 | 00001000 | "r0" |
| mtd6 | 0014c000 | 00001000 | "k1" |
| mtd7 | 00274000 | 00001000 | "r1" |
| mtd8 | 00001000 | 00001000 | "Partition_008" |
| mtd9 | 00001000 | 00001000 | "Partition_009" |
| mtd10 | 00001000 | 00001000 | "Partition_010" |
| mtd11 | 00001000 | 00001000 | "Partition_011" |
| mtd12 | 0014c000 | 00001000 | "linux" |
| mtd13 | 00274000 | 00001000 | "rootfs" |
This stick supports dual boot.
k0 and r0 respectively contain kernel and firmware of the first image, while k1 and r1 contain kernel and firmware of the second one.
Serial
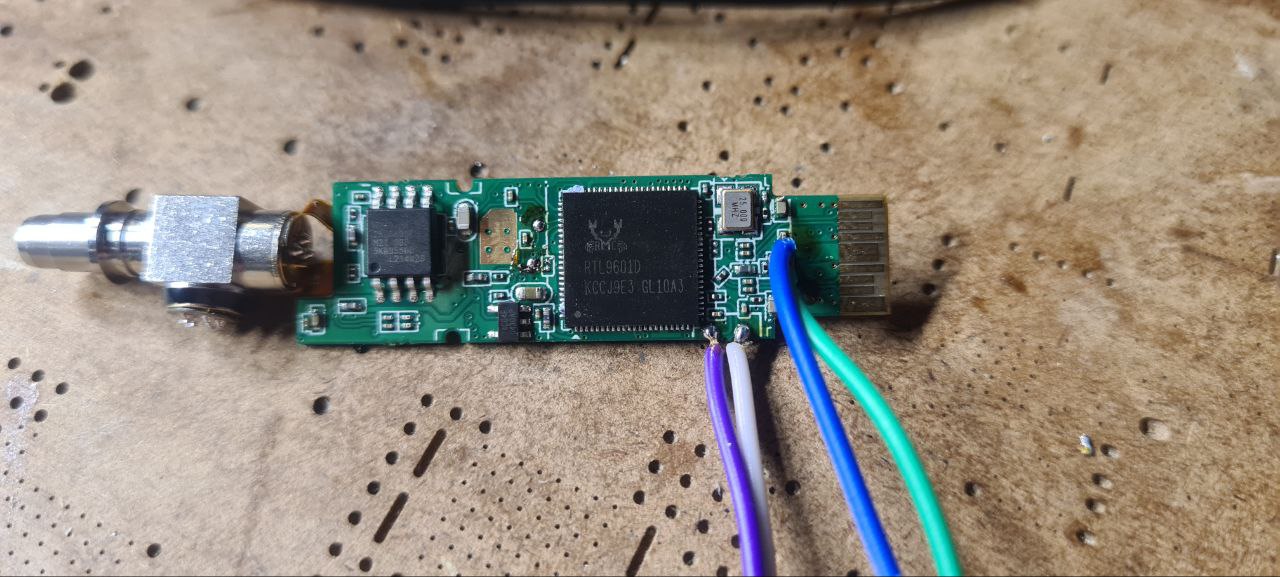
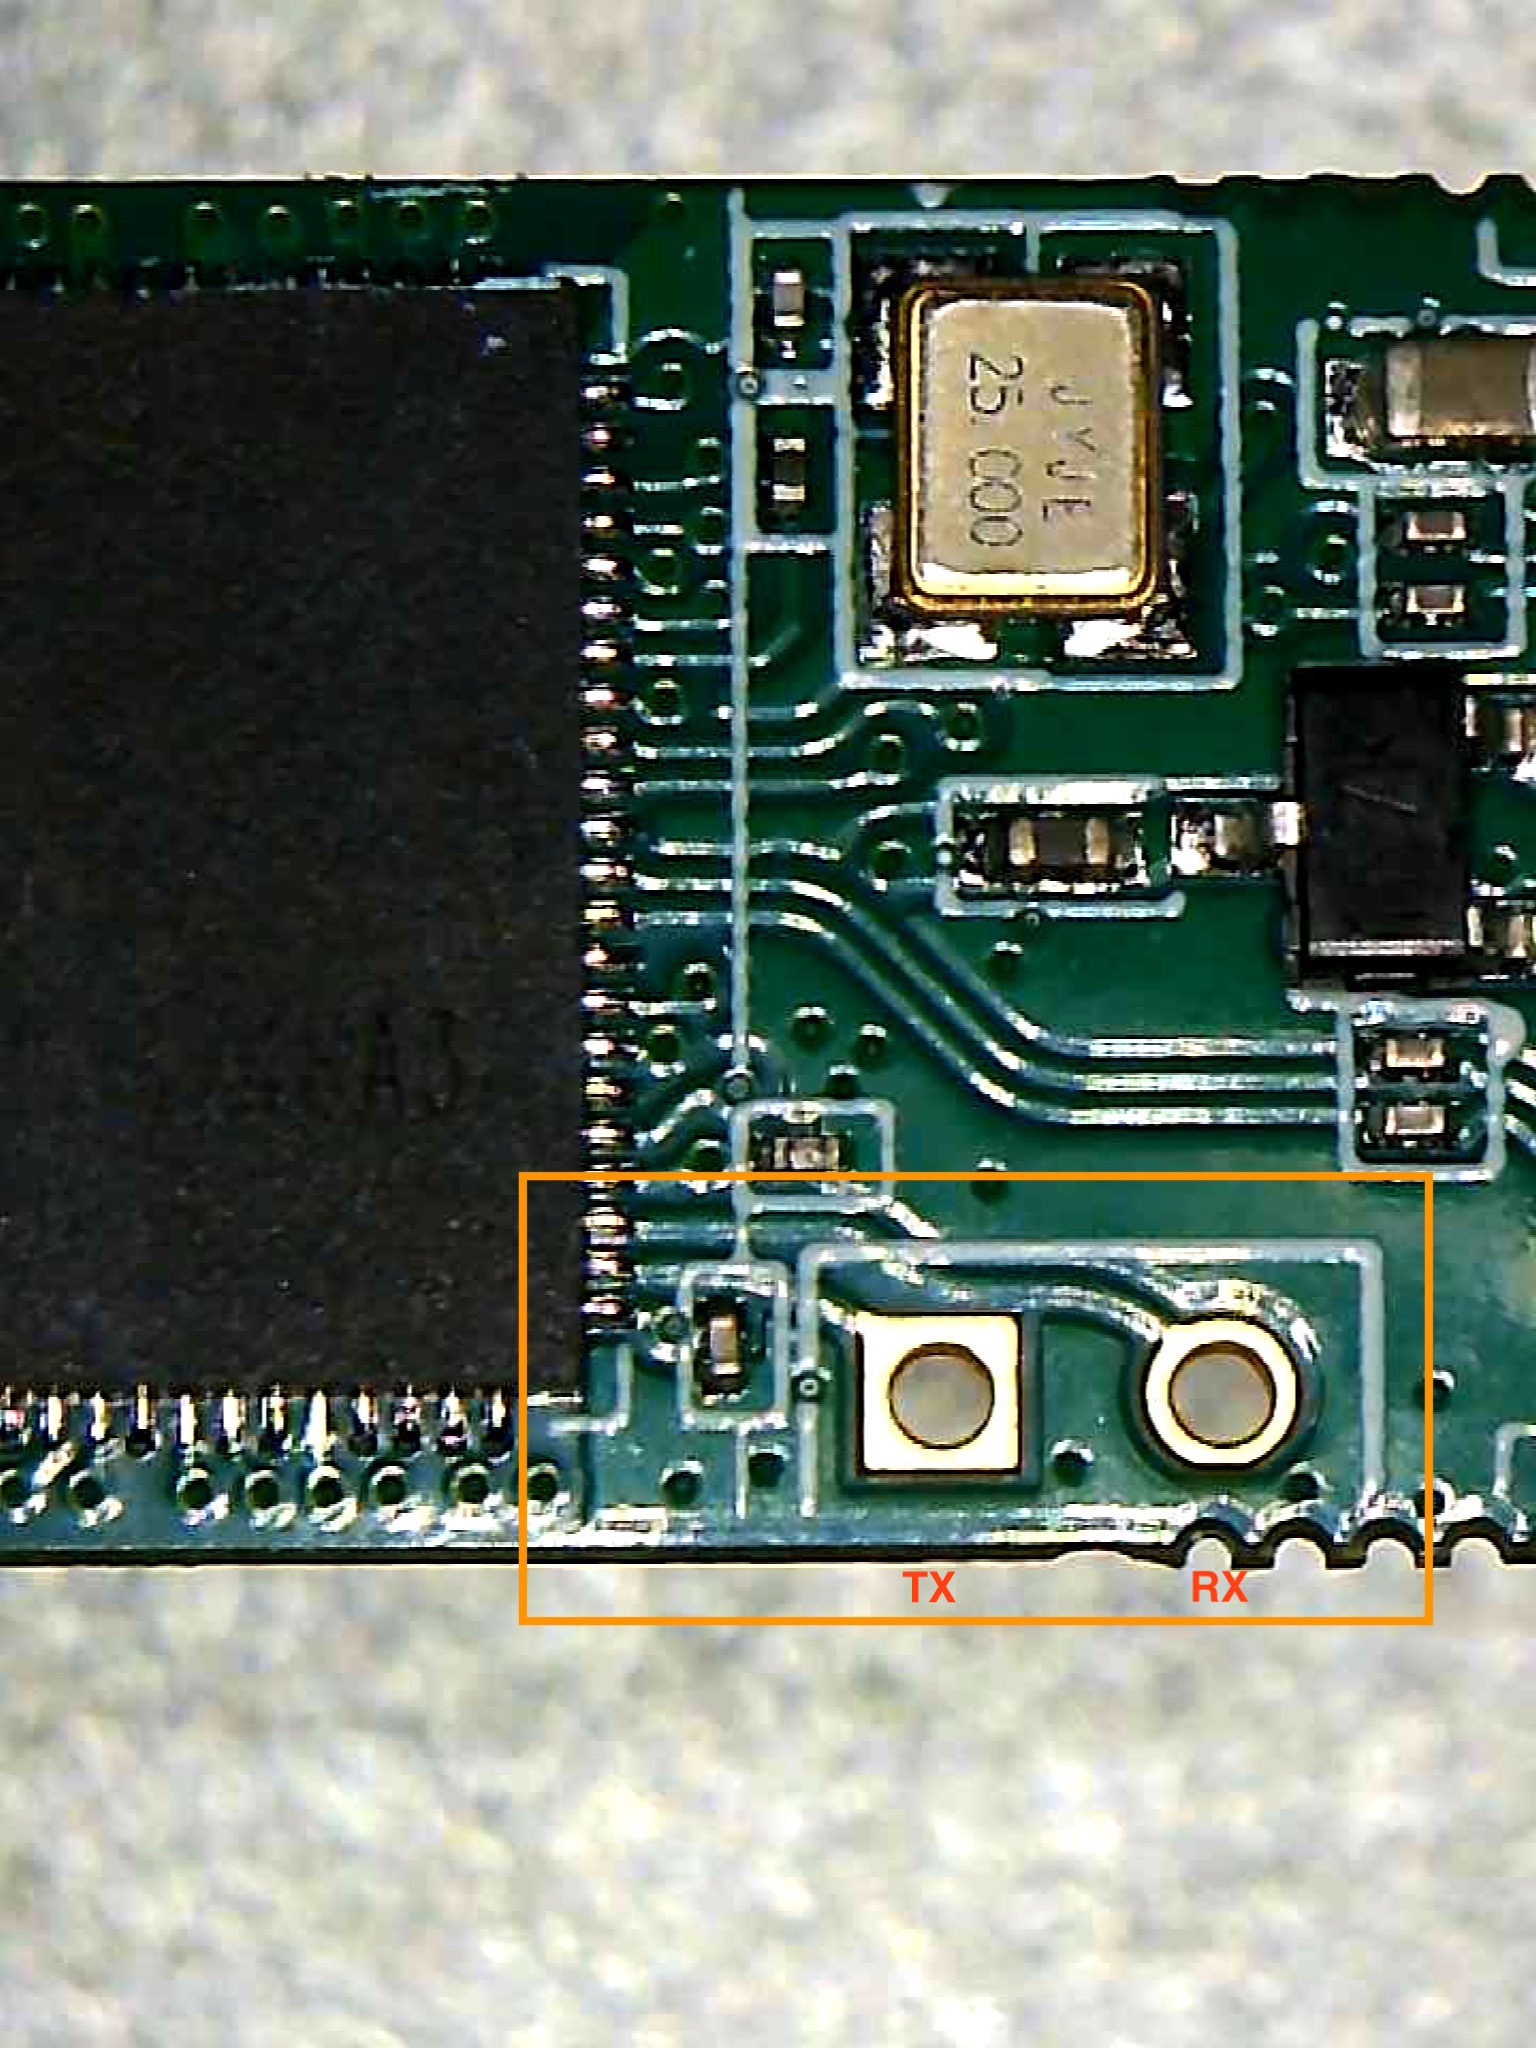
The stick has a TTL 3.3v UART console (configured as 115200 8-N-1) that can be accessed from the top surface: it's near the SFP header. TX, RX and ground pads need to be connected to a USB2TTL adapter supporting 3V3 logic.
Note
Some USB TTL adapters label TX and RX pins the other way around: try to swap them if the connection doesn't work.
On the RTL9601D (88 pins) the UART is on the pins 15 (TX) and 16 (RX)[5]. To power the stick outside of the host use an SFP breakout board or an SFP connector without cage: the USB TTL adapter can't power it.
Useful files and binaries
Useful files
/var/config/lastgood.xml- Contains the user portion of the configuration/tmp/omcilog- OMCI messages logs (must be enabeled, see below)
Useful binaries
flash- Used to manipulate the config files in a somewhat safe mannerxmlconfig- Used for low-level manipulation of the XML config files. Called byflashnv- Used to manipulate nvram storage, including persistent config entries vianv setenv/nv getenvomcicli- Used to interact with the running OMCI daemonomci_app- The OMCI daemondiag- Used to run low-level diagnostics commands on the stick
GPON ONU status
Getting the operational status of the ONU
diag gpon get onu-stateQuerying a particular OMCI ME
# omcicli mib get MIB_IDXThe list of the MEs is in GPON MIB, and the most useful ones to check the provisioning received from the OLT are in Most useful MEs to check the provisioning.
To dump all the MEs at once[6]:
for ME in 2 5 6 7 11 24 45 47 49 50 52 78 79 83 84 89 130 131 133 134 136 137 148 157 158 171 240 244 245 248 249 250 253 255 256 257 262 263 264 266 267 268 272 273 274 277 278 280 281 284 287 296 298 307 308 309 310 311 312 321 322 329 330 334 340 341 65282 65294 65408 65527 65528 65529 65530 65531; do echo "MIB: $ME"; omcicli mib get $ME; doneTo dump the most useful MEs at once:
for ME in 6 7 11 84 131 171 256 257 262 263 264 277 309 329; do echo "MIB: $ME"; omcicli mib get $ME; doneGetting the GEM ports and the flows
# diag gpon show us-flow
============================================================
    GPON ONU MAC U/S Flow Status
Flow ID | GEM Port | Type | TCont
      0 |      263 |  ETH |     0
      1 |      264 |  ETH |     1
     64 |        2 | OMCI |    16
============================================================
# diag gpon show ds-flow
Getting the VLANs bridged by the stick
The L2 table shows the learned MAC addresses with their VLAN (Vid): if the internet traffic arrives untagged on the router, this is a way to find which VLAN is used on the PON side[7].
# diag l2-table get entry address validOn the RTL9601D (e.g. ODI DFP-34X-2C2) the valid parameter is not available, the table has to be read entry by entry:
i=0
while [ $i -lt 2047 ]; do
    diag l2-table get entry address $i | grep -q "LUT" && diag l2-table get entry address $i
    i=$((i+1))
done
Getting the port status and the bandwidth limits
# diag port get status port all
Port Status Speed    Duplex TX_FC RX_FC
---- ------ -----    ------ ----- -----
0    Up     1000M    Full   Dis   Dis
2    Up     1000M    Full   Dis   Dis
# diag bandwidth get egress port all
# diag bandwidth get ingress port all
Getting/Setting Speed LAN Mode
Note
Before editing the speed make sure your hardware supports it.
To change the link mode use this command:
# flash get LAN_SDS_MODE
LAN_SDS_MODE=0
# flash set LAN_SDS_MODE 1| Value | cat /proc/kmsg | Mode | Behavior |
|---|---|---|---|
| 1 | <4>change mode to 1(Fiber 1G) | FIBER | 1GbaseX with auto-neg on |
| 2 | <4>change mode to 2(SGMII PHY) | TP MII | 1Gb PHY |
| 3 | <4>change mode to 3(SGMII MAC) | MII | 1Gb MAC |
| 4 | <4>change mode to 4(HiSGMII PHY) | TP MII | 2.5Gb PHY |
| 5 | <4>change mode to 5(HiSGMII MAC) | MII | 2.5Gb MAC |
| 6 | <4>change mode to 6(2500BaseX) | FIBER | 2500baseX with auto-neg on |
| 7 | <4>change mode to 7(SGMII Force) | TP | 1GbaseT with auto-neg off |
The default value on this stick is 3.
The 2.5G modes are 4 (HiSGMII PHY), 5 (HiSGMII MAC) and 6 (2500BASE-X): most of the hosts that support 2.5G work with the mode 6 and the port forced to 2500BASE-X, see the SFP standard page and the 2.5G compatibility list[8].
WARNING
A LAN_SDS_MODE not supported by the host makes the stick unreachable: the only way to restore it is the serial console.
GPON/OMCI settings
Getting/Setting ONU GPON Serial Number
# flash get GPON_SN
GPON_SN=TMBB00000000
# flash set GPON_SN TMBB0A1B2C3D
Getting/Setting ONU GPON PLOAM password
Note
The PLOAM password is stored in HEX format, without any 0x or separators
From the firmware 220304 onwards only the HEX format is accepted via telnet/SSH (GPON_PLOAM_FORMAT set to 0): use the Web GUI to enter it in ASCII[4:1].
# flash get GPON_PLOAM_PASSWD
GPON_PLOAM_PASSWD=41414141414141414141
# flash set GPON_PLOAM_PASSWD 41414141414141414141
Getting/Setting OMCI software version (ME 7)
Note
This needs either OMCI_OLT_MODE to be set to 3 and firmware version 220530 or 220923 as modded by @stich86 or, if you don't want to replace the installed firmware, set OMCI_OLT_MODE value to 21. This will force the stick to use your own settings from the XML file, but this is a hack and causes sigsegv of /bin/checkomci.
# nv setenv sw_custom_version0 YOURFIRSTSWVER
# nv setenv sw_custom_version1 YOURSECONDSWVER
Getting/Setting OMCI hardware version (ME 256)
# flash get HW_HWVER
HW_HWVER=V2.0
# flash set HW_HWVER MYHWVERSION
Getting/Setting OMCI vendor ID (ME 256)
# flash get PON_VENDOR_ID
PON_VENDOR_ID=ZTEG
# flash set PON_VENDOR_ID HWTC
Getting/Setting OMCI equipment ID (ME 257)
# flash get GPON_ONU_MODEL
GPON_ONU_MODEL=DFP-34X-2C2
# flash set GPON_ONU_MODEL DFP-34X-XXX
Getting/Setting OMCI OLT Mode and Fake OMCI
Configure how ONT Stick handle OMCI from OLT:
# flash get OMCI_OLT_MODE
OMCI_OLT_MODE=1
# flash set OMCI_OLT_MODE 2| Value | Note | OMCI Information |
|---|---|---|
| 0 | Default Mode | Stock setting, some values cannot be changed |
| 1 | Huawei OLT Mode | Huawei MA5671a |
| 2 | ZTE OLT Mode | ZTE |
| 3 | Customized Mode | Custom Software/Hardware Version, OMCC, etc... |
| 21 | Owerflow Mode | Custom Software/Hardware Version, OMCC, etc... (this is a hack and causes sigsegv of /bin/checkomci) |
Some vendors/wholesale providers/ISPs have explicit LAN Port Number provisioning or proprietary OMCI that the stick cannot understand, this will make the stick reply OK to whatever the OLT sends it via OMCI.
0 = Disable, 1 = Enable, Default is 0
# flash get OMCI_FAKE_OK
OMCI_FAKE_OK=0
# flash set OMCI_FAKE_OK 1
Getting/Setting the OMCC version
The OMCC version (ME 257) advertised to the OLT, e.g. 128 (0x80) or 160 (0xA0):
# flash get OMCC_VER
OMCC_VER=128
# flash set OMCC_VER 160
Getting/Setting the OMCI traffic management option
How the OLT manages the upstream bandwidth (ME 256 Traffic management option): if the upload speed is lower than expected, try the other values[9].
# flash get OMCI_TM_OPT
OMCI_TM_OPT=2
# flash set OMCI_TM_OPT 0| Value | Mode |
|---|---|
| 0 | Priority controlled |
| 1 | Rate controlled |
| 2 | Priority and rate controlled |
Getting/Setting the VEIP slot ID
Some OLTs expect the VEIP (ME 329) with the same Entity ID of the original ONT, usually 0x0e01. The slot ID is the most significant byte of the Entity ID (0x0e = 14), and it is applied only if the bit 0x100 (cf_apply_customized_veip_slot_id) of OMCI_CUSTOM_ME is set: the default value on the SFU firmwares is 65536 (0x10000), so it must be set to 65792 (0x10100)[10].
# flash set OMCI_VEIP_SLOT_ID 14
# flash set OMCI_CUSTOM_ME 65792
The other feature bits of OMCI_CUSTOM_ME have been documented by @rajkosto.
Getting/Setting the other identity values
Some OLTs (mostly the ones that accept any ONU, e.g. Fiberhome and Calix) also check other values of the original ONT[4:2]:
| Variable | Description | Example |
|---|---|---|
OUI | Organizationally Unique Identifier of the original MAC address | 875773 |
HW_SERIAL_NO | Hardware serial number (not the GPON serial number) | UONHUWH12341234123 |
ELAN_MAC_ADDR | MAC address of the stick, required by EPON | 781735000000 |
HW_CWMP_MANUFACTURER | TR-069 manufacturer | Huawei Technologies Co., Ltd |
HW_CWMP_PRODUCTCLASS | TR-069 product class | HG8240H |
LOID, LOID_PASSWD | Logical ONU ID and password, used by EPON and some GPON ISPs |
# flash set OUI 875773
# flash set HW_CWMP_MANUFACTURER 'Huawei Technologies Co., Ltd'
WARNING
Changing ELAN_MAC_ADDR requires a new MAC_KEY, see MAC key.
Getting/Setting the PON mode, device type and VLAN mode
| Variable | Values |
|---|---|
PON_MODE | 1 GPON (default), 2 EPON, 3 Ethernet (the PON side works as an Ethernet fiber transceiver) |
DEVICE_TYPE | 0 bridge, 1 router, 2 hybrid |
VLAN_CFG_TYPE | 0 auto (from OMCI), 1 manual (uses VLAN_MANU_MODE) |
VLAN_MANU_MODE | 0 transparent, 1 tagging (Q-in-Q, the outer tag is removed), 2 remote access, 3 special case |
Every flash set requires a reboot to be applied[11].
Advanced settings
Setting management IP
# flash get LAN_IP_ADDR
LAN_IP_ADDR=192.168.2.1
# flash set LAN_IP_ADDR 192.168.1.1
Getting/Setting the L2 Bridge MTU
Note
Settings given via diag are not permanent after reboot
Getting/Setting the MTU of the L2 bridge
# diag switch get max-pkt-len port all
Port Speed
----------
0 1538
2 2031
# diag switch set max-pkt-len port all length 2000
Checking the currently active image
# nv getenv sw_active
sw_active=1
# nv getenv sw_version0
sw_version0=V1_7_8_210412
# nv getenv sw_version1
sw_version1=V1_7_8_210412
Booting to a different image
The firmware upgrade always writes the inactive image, so it is possible to go back to the previous firmware[12]:
# nv setenv sw_commit 0|1
# nv setenv sw_active 0|1
# reboot
Factory reset
DANGER
Make a backup of the env, env2 and config partitions (see this guide) and write down ELAN_MAC_ADDR and the license key (MAC_KEY) before the reset: after it the stick uses the default MAC address, and a wrong key prevents the authentication to the OLT.
The configuration is stored in the config partition (/dev/mtd3), erasing it restores the default settings[1:1]:
# flash_eraseall /dev/mtd3
# reboot
If the stick reboots in a loop, the reset-config-partition.sh script keeps trying until it can erase the partition via SSH.
Modifying the firmware
Warning
A wrong rootfs makes the image unbootable: always flash the inactive image, so that the stick can still boot the other one, and keep a backup of all the partitions.
Transferring files from/to the stick
Run md5sum on the source and on the destination to make sure that the file has not been corrupted.
Via SSH, from the stick to the PC and vice versa:
ssh admin@192.168.1.1 "cat /dev/mtd5" > mtd5.bin
cat rootfs.new | ssh admin@192.168.1.1 "cat > /tmp/rootfs.new"
Via TFTP (a TFTP server must be running on the PC):
# tftp <PC IP>
tftp> get rootfs.new
tftp> put <filename> <directory>
tftp> q
Via netcat (nc on the stick does not exit at the end of the transfer: stop it with CTRL+C)[13]:
# on the stick
nc -l -p 12345 > /tmp/rootfs.new
# on the PC
nc 192.168.1.1 12345 < rootfs.new
Info
On Windows run the commands from cmd (not PowerShell) and replace cat with type.
Extracting and repacking the rootfs
The rootfs is a SquashFS (LZMA) image: on the stick it is in r0 (/dev/mtd5) for the image 0 and in r1 (/dev/mtd7) for the image 1, while the kernel is in k0 (/dev/mtd4) and k1 (/dev/mtd6).
Warning
Run both commands as root, otherwise the rootfs image might be damaged.
# unsquashfs mtd5.bin
# mksquashfs squashfs-root rootfs.new -b 131072 -comp lzma -no-recovery
The RTL960x emulator runs the extracted firmware in QEMU (qemu-user-static) to modify and test it before flashing it: any file in its custom folder is copied over squashfs-root when leaving the chroot, and the custom startup scripts go in /etc/init.d/rc35.
Flashing a new rootfs
Check which image is running (nv getenv sw_active): flash mtd6/mtd7 if the image 0 is running, mtd4/mtd5 if the image 1 is running. The following commands flash a new rootfs to the image 1 and boot it:
# flash_eraseall /dev/mtd7
# cat /tmp/rootfs.new > /dev/mtd7
# nv setenv sw_version1 NEW_SOFTWARE_VERSION
# nv setenv sw_commit 1
# reboot
If cat fails with cat: write error: Invalid Argument, write the image to the block device instead:
# flash_eraseall /dev/mtd7
# cat /tmp/rootfs.new > /dev/mtdblock7
Repacking a firmware upgrade file
The firmware upgrade files of the ODM firmwares (e.g. V-SOL, T&W, ODI) are a tar containing the kernel (uImage), the rootfs, the fwu.sh upgrade script, the fwu_ver version file and the md5.txt checksums: after replacing the rootfs, update the checksums and repack it, then upload it from the Web GUI firmware upgrade page[13:1]:
tar -xf firmware.tar
mv rootfs.new rootfs
md5sum fwu.sh rootfs uImage fwu_ver > md5.txt
tar -cvf ../firmware-mod.tar *
The Firmware_Mod folder of the RTL960x repository contains the community patches for the ODI DFP-34X-2C2, V-SOL V2801F and T&W TWCGPON657 (Bootstrap Web GUI, VLAN, speed and software version fixes).
Known Bugs
- Auto-sensing mode to switch between SGMII/HiSGMII
- Slow upload with the 2.5G modes on some OLTs, mostly when the original ONT is also Realtek based: try another
OMCI_TM_OPT, thefix_speed.shscript or remove the bandwidth limits at runtime[9:1]:shdiag port set auto-nego port all ability asy-flow-control diag bandwidth set egress port all rate 4194296 diag bandwidth set ingress port all rate 4194296 - With a 2.5G link the host can send more than the ~1.24 Gbps of the GPON upstream, causing drops and bufferbloat: limit the egress on the host, see MikroTik
Miscellaneous Links
- Hacking RTL960x
- RTL960x stick setup guide
- English ODI configuration guide by @rajkosto
- Making it work on the Intel 82599ES
- Asenheim firmware repository - alternative firmware collection for ODI/HSGQ, Alcatel/Nokia and Huawei modules
- Ditch ONU, use GPON SFP on Business Grade Router, Mikrotik/Ubiquiti/pfSense (Home Networking)
- Orange France at 2 Gbps with a MikroTik CCR2004
- Pururin Collective forum
- For the old model ODI ZTE DFP-34G-C2C
Factory Reset, Anime4000/RTL960x https://github.com/Anime4000/RTL960x/blob/main/Docs/factory_reset.md ↩︎ ↩︎
ODI DFP-34X-2C2 firmware, Anime4000/RTL960x https://github.com/Anime4000/RTL960x/tree/main/Firmware/DFP-34X-2C2 ↩︎
ISP specific configuration, Anime4000/RTL960x https://github.com/Anime4000/RTL960x/blob/main/Docs/ISP_specific_configuration.md ↩︎
RTL960x SFP xPON ONU Configuration Guide, Anime4000/RTL960x https://github.com/Anime4000/RTL960x/blob/main/Docs/StickSetup.md ↩︎ ↩︎ ↩︎
UART, Anime4000/RTL960x https://github.com/Anime4000/RTL960x/blob/main/Docs/UART.md ↩︎
OMCI MIB, Anime4000/RTL960x https://github.com/Anime4000/RTL960x/blob/main/Docs/OMCI_CLI.md ↩︎
Diag, Anime4000/RTL960x https://github.com/Anime4000/RTL960x/blob/main/Docs/DIAG.md ↩︎
2.5Gb Compatibility, Anime4000/RTL960x https://github.com/Anime4000/RTL960x/blob/main/Docs/2.5Gb.md ↩︎
Slow Upload Speed, Anime4000/RTL960x https://github.com/Anime4000/RTL960x/blob/main/Docs/SlowUploadSpeed.md ↩︎ ↩︎
OMCI_VEIP_SLOT_ID, Anime4000/RTL960x https://github.com/Anime4000/RTL960x/blob/main/Docs/VEIP.md ↩︎flash get,flash set, Anime4000/RTL960x https://github.com/Anime4000/RTL960x/blob/main/Docs/FLASH_GETSET_INFO.md ↩︎Firmware Partition, Anime4000/RTL960x https://github.com/Anime4000/RTL960x/blob/main/Docs/fw_part.md ↩︎
Modify firmware, Anime4000/RTL960x https://github.com/Anime4000/RTL960x/blob/main/Docs/Modify_Firmware.md ↩︎ ↩︎